Showing posts with label recipe. Show all posts

Saturday, October 24, 2009

Iron Chef Vegan Mofo Entry


The ingredients this week were peanut butter and apples. I figured that they were something I could do something with and while this is not the most inventive idea (I took the apple peanut butter wrap idea and ran with it a bit). It is quite good.

Apple Peanut Butter Desert Chimichanga

1 tortilla, burrito sized (or more if making more than one)

1 apple, chopped

1 banana, sliced

1-2 Tbs peanut butter, smooth is better but chunky is alright also

Drizzle of dark agave nectar

Chocolate chips (optional, but add a nice taste)

Walnuts, chopped (optional)

Take the chopped apple and sliced banana and sprinkle with some lemon juice, so that if you don’t use them all know, you can eat them later without being brown. Spread the peanut butter on the top ½ of a burrito size tortilla. Add the apples and bananas, drizzle the agave nectar, then add the chocolate chips and walnuts. Fold like a burrito and place on a heat pan until one side is crisp. Roll over and cook until the other side is crisp. Let cool, slice and eat.

Simple, easy to make and quite good. I used a Fuji, but a baking apple would be better, just couldn’t find any today. So there you are, enjoy.

Friday, May 15, 2009

Rice Milk Recipe and Some News

Rice Milk Recipe and Some News

I had high hopes for this week. Unfortunately, they got waylaid due to me catching either a really bad cold or possibly the flu (don’t know which one) from a recruiter when I went on an interview late last week. So, except for a few smoothies and odds and ends, I really have not eaten much at all. I didn’t even have coffee for most of the week. However, I am better now.

I did manage to get the rice milk recipe perfected before I got ill. Good thing, since I have been using so much of it that the mix is just about half gone already. And I just made it on Monday. The revised recipe is below.

Rice Milk Base

3 3/4 cup water
1 Tbsp vanilla
1/2 cup rice flour white
1/2 cup heaping, almond flour
1/2 cup light agave nectar
2 Tbsp coconut oil

Bring 3 cups water to a boil in a medium sized saucepan.

Add the vanilla and rice flour to 3/4 cup water, stirring thoroughly.

Once the water boils, stir in the rice flour mixture, stirring constantly with a whisk. Turn heat to medium-low and boil at least five minutes, stirring constantly, until the mixture is thick and no longer gritty.

Depending on equipment available:

No high powered blender:

Put almond flour, agave nectar and coconut oil into blender and blend till smooth (a Magic Bullet is fine). Add to rice flour mixture and mix with stick blender or regular blender until smooth.

High powered blender (VitaMix, etc.):

Let rice flour mixture cool. Add rice flour mixture, almond flour, agave nectar and coconut oil to blender and blend till smooth.

Once mixture is smooth and cool, pour into covered container and place in refrigerator.

Yield: 5-6 cups, probably closer to 5 ½ on average

To make rice milk:

8 oz
1/4 cup base and 3/4 cup water: mix till combined

16 oz
1/2 cup base and 1 1/2 cup water: mix till combined

It will separate in the refrigerator, but will remix quickly upon shaking.


This recipe mixes up quite smooth once blended and the almond flour is now emulsified enough that it blends easier into the rice flour mixture. The “milk” is rich enough that I drank it plain (no chocolate) and was quite satisfied. I have also used it in some cooking this week, for pancakes and some of Bryanna Grogan’s soy free mayonnaise, and it worked as well as commercial rice milk.

I had planned on doing my entry for the Tried & Tasted event, being hosted by Vaishali at Holy Cow!, featuring recipes from SusanV at the Fat Free Vegan blog. However, it is a month long event, so next week will have to do. At least what I had planned on making works for both my schedule this week and also my schedule for next week. If you would like to join in, check out the details over at Vaishali’s blog. This is the first time for me to join in one of these blog events, but to help show all the good things that Susan makes, and that she makes dishes that are either soy free or can be made soy free easily was a no brainer for me.

Now that I have kept you in suspense; the news is that as of Monday, I have a long term temporary assignment. It is at the same place where the TeddyBear works, but not in the same department. The pay is decent and due to this department being behind, I have to do a minimum of 8 hours of overtime a week, which will greatly help the paycheck. But it will greatly affect my cooking. Expect to see more quick and easy dishes. I have a feeling that the Chick-fu will become a more regular part of my diet, since it will be easy to make a meal around that in the evenings. I might also start to feature my lunches as well.

And in case you are curious what a bunny does to celebrate a new job. Why she goes grocery shopping and buys her new favorite ice cream, Coconut Bliss Hazelnut Fudge. It is quite nutty, chocolaty and satisfying.

See you all next week.

Friday, April 24, 2009

Indian Dinner Redux and More Rice Milk


Dinner was the Indian Spice Vegetables with some of the Tamarind Lentils on the side. Thankfully, after sitting a few days, the vegetables were more flavorful and just a bit spicy. And just to tell you exciting I found dinner, this photograph was taken when I was half-way through, because I forgot to take it first. Guess leftovers are getting to me a bit.


In other news, I made anther batch of the rice milk base today. This time it was a bit different. I upped the agave nectar to ½ cup and added 2 Tbsp of coconut oil; per idea from kateboy when I originally put this up. I also blended the base mix while it was hot with my immersion blender. However, I think this recipe will have one more version before it is to where I want it. The almond flour still does not get as mixed in as I would like it to do so. I think for the next iteration, I am going to run the almond flour, coconut oil and agave nectar through the Magic Bullet and get them well emulsified. Then blend with the immersion blender after cooking the rice flour and water. If I can get rid of the little chunks of almond flour, then this should be really good. I also measured it this time and ended up with a bit less than 5 ½ cups, which is a nice amount.


The best finding about this current iteration is that I no longer need the Magic Bullet to create the rice milk when adding the water. All I did this time was added the base and water to the pitcher and shook it up. It blended quite well and should stay emulsified for quite a while.

Tuesday, April 7, 2009

Dinner and Rice Milk Recipe


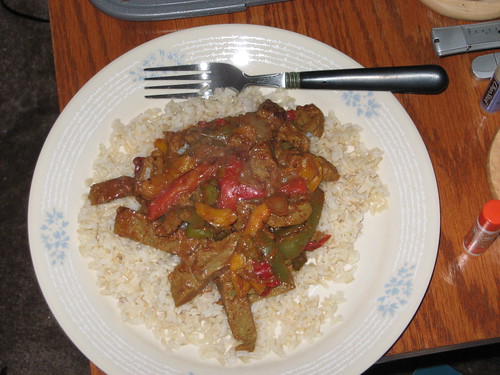
Dinner was really simple. Stir fried onion and pepper mix from the freezer, sliced seitan cutlets (done on Sunday) and some more of that Molo sauce I made in February. All very simple, just through in a pan and cook. Then put over rice. Instant dinner. Actually this is how I am used to cooking, since a day of work usually makes me to tired to really make anything at the end of the day.

However, I know why you are here tonight. You all want to see the recipe for rice milk. Since I aim to please, here it is. But I will caution you, this is still a bit untested. It might need more agave nectar to make it sweeter. And I have not tried this with a natural sugar or molasses. You can if you would like to, but I have no idea what the measurements would be. I am not making it as sweet as it could be, since I usually have chocolate milk or have it over a sweet cereal. If you want to make is sweeter, go right ahead. This is also a half a batch, so if you want to make more, it should double easily.

Bunny’s Rice Milk (based off of this recipe)

3 ¾ cup water
½ cup white rice flour (may also use brown rice flour)
½ cup almond flour (optional)
½ cup agave nectar (you can add up to a 1 cup if you want it sweeter)
1 Tbsp vanilla

Bring 3 cups water to a boil in a medium sized saucepan.

Add the vanilla and rice flour to 3/4 cup water, stirring thoroughly.

Once the water boils, stir in the rice flour mixture, stirring constantly with a whisk. Turn heat to medium-low and boil at least five minutes, stirring constantly, until the mixture is thick and no longer gritty.

Pour the mixture into a mixing bowl and stir in the almond flour and agave nectar, till combined. Once mixture is cool, add it to your blender (or mix with your counter top mixer) and run till mixture is thoroughly combined and mixture appears to be smooth and semi-liquid. Place in covered container and refrigerate. Should be good for up to two weeks.

Yield: 5-6 cups? Base (I haven’t calculated total servings yet)

To make rice milk
8 oz
1/4 cup base and 3/4 cup water: blend till combined (I do in my Magic Bullet, but it may work to just stir it in)

16 oz
1/2 cup base and 1 1/2 cup water: blend till combined (I do in my Magic Bullet, but it may work to just stir it in)

It will separate in the refrigerator, but will remix quickly in the jar upon shaking.

Monday, December 22, 2008

Baked Seitan Steaks II

Sorry guys, no food today. We are having leftovers, the Black Bean Burgers (VCON) again with oven baked onion rings and some steamed frozen corn. So I am going to give you a treat. An almost impossible to mess up seitan (or so I think). And while I put this combination together, it rests on the backs of two blogging giants, Celine at Have Cake will Travel and Bryanna Grogan at Notes from the Vegan Feast Kitchen. They both, very graciously, have allowed me to post my version of baked seitan using a recipe from Celine and a technique from Bryanna (along with her recipe for “Chicken” Style Broth Powder).

First some history. The seitan recipe comes from one that Celine posted for Baked Seitan Steaks, based on the turkey flavorings used by Sarah Kramer in one of her seitan recipes. I made it a few times and really liked it, since it only makes a small amount and was easy to do. However, it came out “bready” for me. Even with a good bit of kneading it was still “bready” after being baked. Then I was looking at the Seitan “Turkey” recipe of Bryanna’s and did really think about making it. Especially since it looked like the recipe could be halved without any major problems. But the more I looked at what it would take to make that seitan, and how much work it would be by hand and also how much it would make, it just didn’t seem feasible in my tiny kitchen. So in a flash of inspiration I decided to combine Celine’s recipe with Bryanna’s technique of baking the seitan with a broth, with one addition of my own; some chickpea flour added to the seitan.

The first time I tried it, the seitan came out great; even though I forgot both the nutritional yeast and the chickpea flour. It was soft, had a wonderful flavor, a great texture and very moist. In fact that first batch is still in my refrigerator and is still moist, even though it is not stored in a broth. And the best part is that I can make it in my toaster oven in a small casserole; though if one wanted to, it could also be cooked as one big loaf in a small loaf pan as well.

Now while I claim this is almost foolproof, we all know that seitan can be a bit touchy; so I will make no promises. However, Bryanna’s technique of baking the seitan with a broth prevents a lot of potential problems. If you have never tried seitan before, this might be a good recipe to start with, since it is fairly simple. For those who don’t make the “Chicken” Style Broth Powder for the baking broth and use a commercial version, remember that it may turn out saltier than you may like. That is why I say that you only need one teaspoon of the commercial powder and you may also want to skip the salt in the seitan as well. As an added bonus, Bryanna’s broth powder can be soy free, for those of you that are allergic.

Baked Seitan Steaks II

Seitan:
1 cup vital wheat gluten
1 cup water
1 1/2 Tbs tamari (or your favorite soy sauce replacement)
3 Tbs nutritional yeast
1/2 tsp salt [optional, if you're watching your sodium intake, since there is tamari already]
1 tsp Vegan Worcestershire sauce
1 tsp onion powder
1/2 tsp dried sage
1/2 tsp dried thyme
Or 2 tsp Poultry Seasoning
2 Tbs chickpea flour (optional, if you want it)
Broth:
1 cup water, hot
2 tsp Bryanna's "Chicken" Style broth powder (see recipe below) or 1 tsp commercial unchicken broth powder

1. Combine dry ingredients in one bowl and liquid ingredients in another. Stir together till combined and then knead for at least 5 minutes (edit: dough may feel gritty, don't worry, broth will be absorbed when cooking and grittiness will not be evident in final product). Let seitan rest for 5 minutes.
2. Prepare stock with water and broth powder
3. Shape your seitan in two steaks (I cut the seitan in half with a metal pastry scraper and shape each half). Place steaks in pan and pour broth over them and cover with aluminum foil. Cook in 350 degree oven for 30 minutes, turn over and cook for another 30 minutes. Let cool in pan till close to room temperature (about 1 hour). Then place seitan in a storage container and put in refrigerator or wrap in foil and freeze till needed.
4. If using a loaf pan, the put the entire amount of seitan in the bottom of the loaf pan, cover with the broth and then cover the loaf pan with aluminum foil, making a tent over the pan. Place in the 350 degree oven and flip after 30 minutes like above. Take out when done and let cool till room temperature and place in the refrigerator or wrap in foil and place in the freezer.

Edit to add: feel free to double or triple this recipe, it still cooks up very well, if you want a nice loaf to get sliced cutlets or for lunch meat I recommend tripling the recipe and turning the loaf after one hour then testing after a second hour to see if it is done, if not then check in 15 minute intervals until another hour has elapsed, can also make steaks in a multiplied recipe but need to increase pan size, 8x8 for a double recipe, possibly up to 11x17 for a triple recipe, also increase cooking times proportionally

Servings: 4
Yield: 2 big steaks or one medium size seitan loaf
edit: good 7 days in the refrigerator, possibly up to 8 weeks in the freezer (will update if changes)

BRYANNA'S HOMEMADE VEGAN "CHICKEN-STYLE" BROTH POWDER

NOTE: I used to call for 1 Tbs. powder per cup of water, but have found that 2 tsp. works just fine!

I invented this broth powder when I was having trouble finding a natural broth powder here in Canada that actually tasted good! It's cheap and easy to make and has excellent flavor. You need to use twice as much of this homemade broth powder as Seitenbacher, but the sodium comes out about the same.

Yield: 1 1/4 cups or 30 cups of broth

1 1/3 cups nutritional yeast flakes
3 Tbs onion powder
7 1/2 tsp (2 1/2 Tbs) sea salt
1 Tbs soy protein powder (OR rice protein powder)
1 Tbs vegan sugar
2 1/2 tsp. garlic granules or powder
1 tsp dried thyme
1 tsp finely crumbled dried sage (NOT powdered)
1 tsp paprika
1/2 tsp turmeric

Blend in a dry blender or food processor until powdery. Store in a dry, airtight container .

Use 2 level teaspoons per cup of boiling water.


These are the steaks after shaping and before covering the pan with foil to bake for the first 30 minutes.


These are the steaks after cooking for 80 minutes and being turned over.


These are the steaks after cooking for an hour and cooling in the pan for an hour. At this point you can put then in a container and refrigerate them or wrap them in foil and freeze them.


Hope you all enjoy this. If you are still looking for something for Christmas, it is not to late to make it. I made mine last week and put them in the freezer. All I have to do is thaw them out and reheat it on Thursday.

This may be my only post this week, so I will see you after Christmas and hope all of you have a Merry Christmas, Happy Hanukkah, and also a good Kwanza.

Wednesday, November 26, 2008

Burmese Tofu-An Introduction

As promised, today is about Burmese Tofu. For those of you not familiar with this product, it is not really a “tofu”. The texture is more like polenta. As the name implies, the origin of this product is the land of Burma, or as we now know it, Myanmar. This is something I found on the PPK site and a few of us have been experimenting with it. The dish today is made with a chickpea version of this dish, but it can also be made with rice flour or even yellow split pea flour. In all cases the technique is the same. I’m not going to give you a primer in how to make it today, since I didn’t take pictures when I made my last batch. However, if you would like the full recipe you can find it over at JohnP’s blog The I-40 Kitchen . Also please check out these links below.

http://www.postpunkkitchen.com/forum/viewtopic.php?id=51731

http://en.wikipedia.org/wiki/Burmese_tofu

http://www.netcooks.com/recipes/Salads/Burmese-Style.Tofu.html original recipe, see link to simplified version above

http://www.flickr.com/photos/15586812@N05/2317329454/ block of completed Burmese Tofu at JohnP’s photostream

some pictures of a scramble

http://www.flickr.com/photos/15586812@N05/2324624641/

http://www.flickr.com/photos/15586812@N05/2325444796/

http://www.flickr.com/photos/15586812@N05/2325444340/

here is a quiche that JohnP made with it
http://www.flickr.com/photos/15586812@N05/2345733587/

From A-K at Swell Vegan
http://swellvegan.wordpress.com/2008/04/12/chickpea-tofu-thai-dinner/

my flickr photostream of Burmese Tofu dishes (small now, but will grow)
http://flickr.com/photos/snugglebunny2/sets/72157610022635698/

Now I must confess that the way it is cooked tonight is not an original idea by me. I’ve borrowed this from Dawn (Deearess at PPK) over at Veg-Am . When I saw this, I realized that it had a lot of possibilities. Since I didn’t have the spices she used, I used some regular Mrs. Dash, but any seasonings should work. This will be interesting with either southwest or jerk spices. Can’t wait to try those. But here is what I had for dinner tonight. (Recipe below picture)


SBunnies Seasoned Burmese Tofu

Serves 1 (increase as needed)

½ cup rice or other nut milk (add more in splashes if to thick)
½ cup almond flour (use more if needed)
1-2 tsp Mrs. Dash Regular Blend (or favorite spices)
Burmese Tofu

Pour the rice/nut milk into a container. Add the almond flour gradually and stir with a fork or small whisk until thickened. Add more if needed. Add the Mrs. Dash to taste, up to 2 tsp. Stir. Cut some slabs off the tofu block. Coat with seasoned batter and pan fry on medium-low till crispy on each side.

Now this is still a recipe in progress, so if you can make any suggestions please do. I didn’t get the batter just right, but it was still good.

No post tomorrow since it is American Thanksgiving. Teddybear and I are just having Baked Seitan Steaks, corn, potato rolls, stuffing, cranberry sauce, mashed potatoes, candied sweet potatoes (these are just for me, he doesn’t like them) and some pie for me and ice cream for him. Nothing fancy, but it is just the two of us and so we don’t need much. At least he isn’t working this year. May be back on Friday, if not then will see you next week.

Tuesday, November 25, 2008

Smoked Paprika Seitan

Sorry, but no Burmese Tofu tonight. I was going through my refrigerator today and realized that I had a some left overs that needed to be eaten. So I thought I would introduce you to your other new friend, seitan.

For those of you that are not familiar with it, seitan is basically wheat gluten that is flavored then simmered/poached, steamed or baked. It was invented by the Zen monks of Japan as a meat replacement. Now some vegans/vegetarians will not eat seitan since the taste and feel can be quite similar to meat. However, if you are not eating tofu, then this will be your primary meat replacer. It is acutally fairly versatile and recipes for it abound both on the net and in vegan cookbooks. However, it does take a bit of practice to get good at making it, since the technique can be a bit tricky. I am far from a seitan expert (at least for now), so if you are having problems, may I suggest that you check out the both the forums at postpunkkitchen.com or over at VeggieBoards. Each of these places has recipes as well and at PPK you can get the original baked seitan (at least as far as I know) from Lacheis, the Seitan O'Greatness.


This was my dinner tonight. It is an adaption of a recipe from Rachel Ray for Cashew Chipotle Chicken. I'll put the recipe below, but here are my adaptations. I cheated and used a whole bag of pepper and onion stir fry, green beans replaced the peas, smoked paprika in place of the chipotle and I skipped the cashews since they don't seem to work with this variation as well. I also realized halfway through that I didn't have any water chestnuts, so those are missing as well. The last two replacements are light agave nectar for the honey and dark agave nectar for the maple syrup.

Chipotle Cashew Seitan with Brown Rice Recipe
1 tablespoon extra-virgin olive oil
2 tablespoons butter
1 large onion, 1/4 onion finely chopped, 3/4 thinly sliced
2 cups quick cooking brown rice
4 cups vegetable stock
2 tablespoons vegetable oil
2 pounds seitan meat: cut into 2-inch pieces
2 tablespoons grill seasoning blend (recommended: Montreal Steak Seasoning blend by McCormick)
2 to 3 tablespoons tamari dark soy sauce, eyeball it
4 cloves garlic, chopped
1 red bell pepper, seeded and thinly sliced
10 to 12 water chestnuts, whole
1 cup frozen green peas
3 tablespoons chipotle in adobo (2 peppers and their sauce), available in cans on the international foods aisle or substitute 1 1/2 tablespoons ground chipotle powder
1 tablespoon ground cumin, a palm full
2 to 3 tablespoons light agave nectar, 2 healthy drizzles
1/4 to 1/3 cup real maple syrup, eyeball it
2 to 3 tablespoons chopped cilantro or parsley leaves, your preference
1 cup raw cashews

1 In a medium pot over medium heat combine 1 tablespoon extra-virgin olive oil, 1 turn of the pan, and 1 tablespoon butter. When butter melts into oil, add in the chopped onion, cook 2 minutes, then add rice and cook 3 minutes more. Add stock and cover the pot. Raise heat to bring stock to a rapid boil. Once the stock boils, reduce heat to low and cook, stirring occasionally, until rice is tender, 17-18 minutes.

2 While rice cooks, make the seitan. Heat a large skillet over high heat. Add vegetable oil, 2 turns of the pan, then the seitan. Season the seitan with grill seasoning. Brown the seitan on both sides, season with soy sauce then move off to one side of the pan. Add the remaining onions, garlic and peppers. Cook 2 to 3 minutes then add water chest nuts and green peas and mix vegetables and meat together. Add the chipotles and cumin. Toss to coat. Glaze the mixture with agave and maple syrup and turn off the heat. Add in the chopped cilantro or parsley and the cashew nuts.

3 Top rice with cashew seitan and serve.

Servings: 6
Yield: 4 to 6 servings
Preparation time: 15 minutes
Cooking time: 25 minutes
Recipe Source

Author: Rachael Ray
Web page: Chicken Style Seitan Cutlets, from YRR, but feel free to use your favorite.

Tomorrow, promise, will show you the Burmese Tofu.